Animal Detection & Tracking
An automated animal detection algorithm operates continuously on both the corridor camera and the operant box camera. The algorithm processes each image by converting it to black-and-white pixels based on a set luminance threshold (pixels above the threshold are marked white, and those below are marked black). By counting the black pixels, the system determines whether a specific area is empty, contains one mouse, or holds multiple animals.
In addition to this pixel-counting baseline, an advanced tracking algorithm runs by default on the operant box camera feed. This module tracks the animal’s absolute position in real time utilizing OpenCV’s contour detection (findContours) to compute the exact center of mass (centroid) of the subject.
While this advanced tracking module increases CPU overhead, its execution time at a resolution of 640x480 is highly optimized, taking only 4 to 5 ms per frame. Given the standard frame rate of the operant box camera (30 fps, or approximately 33 ms per frame), the system has more than enough computational headroom to execute tracking on every single frame without latency.
This advanced tracking module can be toggled on or off via SETTINGS -> CAMERA SETTINGS -> CAM_BOX_TRACKING_POSITION.
Important
As mentioned previously, maintaining uniform and stable illumination—both visible and infrared, across both the corridor and the operant box environments—is absolutely critical for accurate computer vision tracking.
Detection in the Corridor
The physical corridor is typically constructed using white 3D-printing filament, which optimizes the detection of dark-colored animals. However, if your facility uses light-colored animals, the corridor can be printed in black. You can easily invert the binary logic by configuring SETTINGS -> CORRIDOR SETTINGS -> DETECTION_COLOR.
Note
Toggling the DETECTION_COLOR parameter automatically synchronizes the pixel detection logic across both the corridor and the operant box cameras simultaneously.
To set up detection in the corridor, you must configure four distinct bounding boxes (represented by the green, magenta, blue, and red rectangles in the interface):
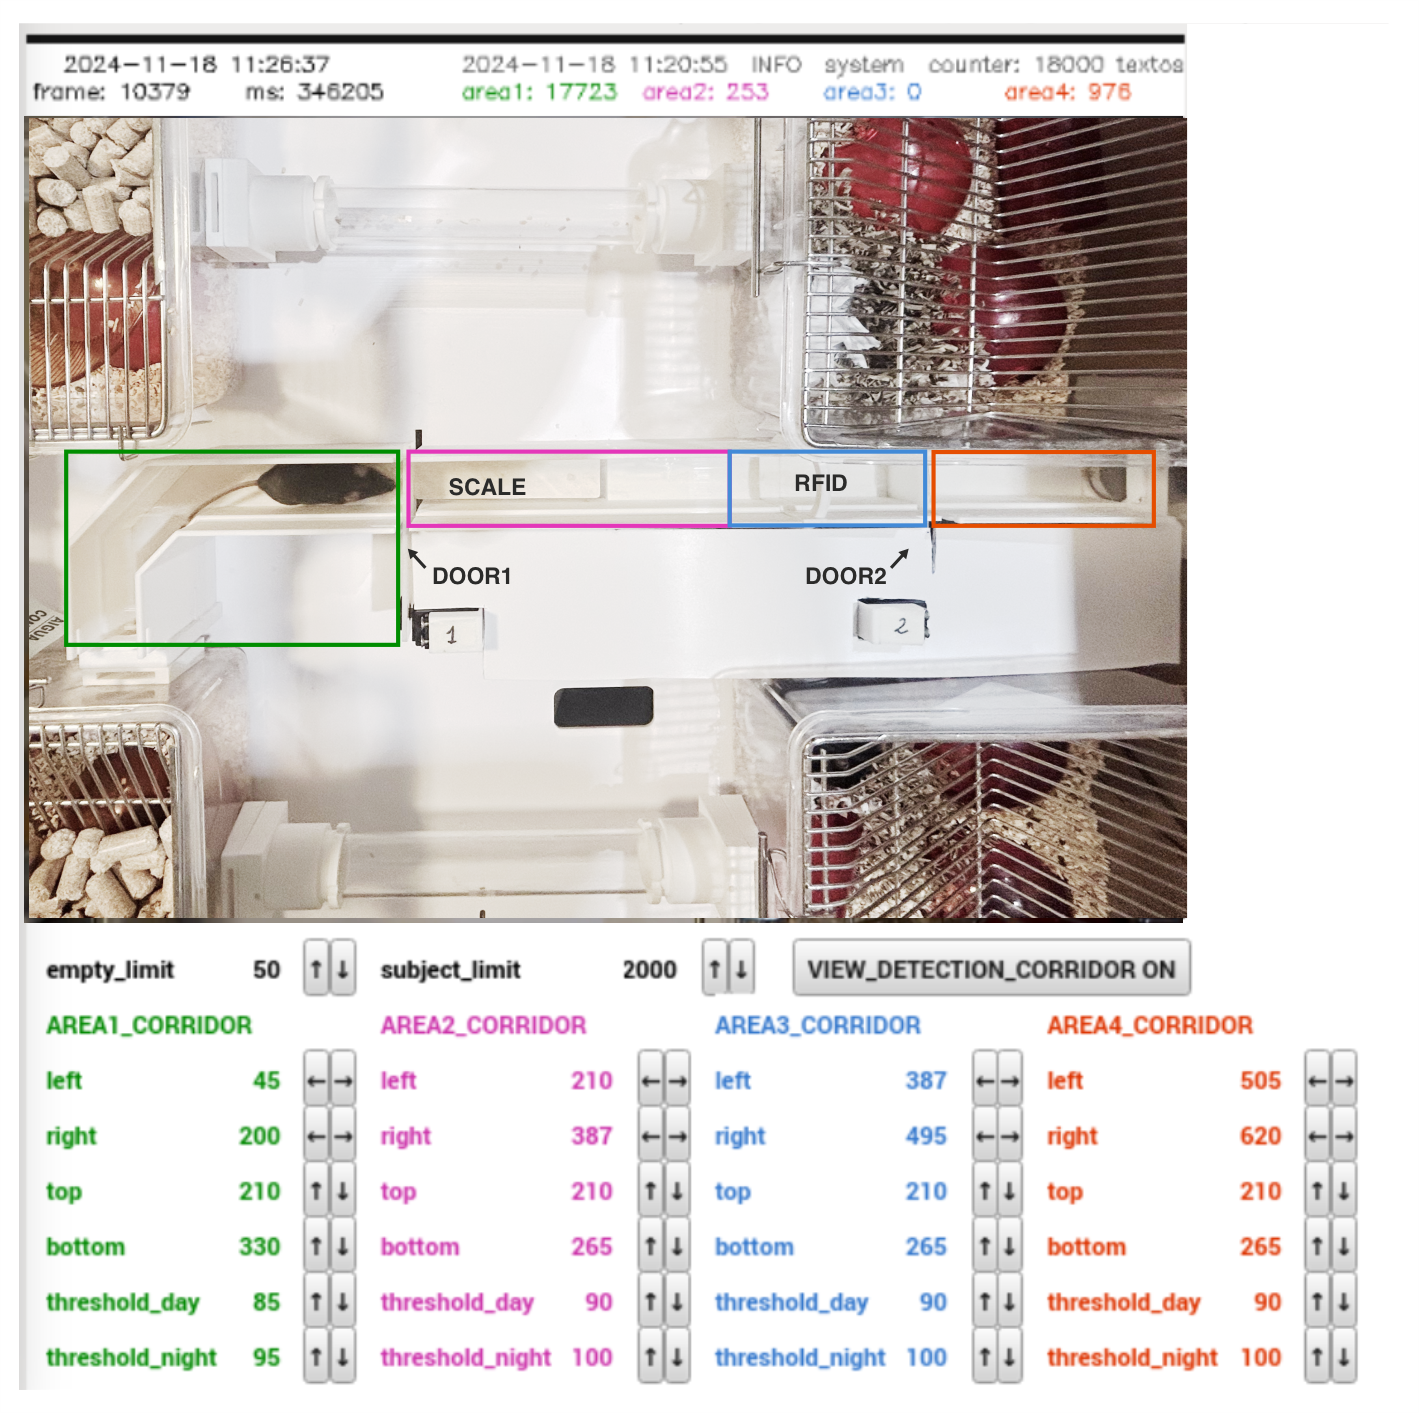
Area 1: Should cover the corridor section before the first door.Area 2: Should span from the first door up to the beginning of Area 3.Area 3: Starts where Area 2 ends and extends to the second door. It should be large enough to fully contain one mouse but not exceed that size significantly. This is the area where the RFID reader is located.Area 4: Should cover the corridor section after the second door.
Important
Access is granted only when Areas 1, 2, and 4 are empty and Area 3 is occupied by exactly one animal. Consequently, Area 3 should be sized to fully accommodate a single animal while remaining small enough to make it harder for two animals to fit inside it simultaneously. That said, when animals are very close together it may be unavoidable that two of them are completely inside Area 3, which is why the system also enforces a maximum pixel count condition, described below.
The system classifies the occupancy of each area based on three key parameters:
threshold: The numerical value that determines whether a pixel is classified as white or black. This parameter is adjusted independently for each area. It should be tuned so that when the area is completely empty, the detected pixel count is zero, and when an animal is present, it captures the maximum possible number of pixels.empty_limit: The maximum number of detected pixels allowed before an area is flagged as occupied.subject_limit: The maximum pixel threshold for a single animal. Exceeding this limit flags the area as potentially containing multiple subjects.
To calibrate the binarization threshold, allow an animal into the corridor and enable the VIEW_DETECTION overlay. This visual feedback highlights the binarized pixels in real time, letting you tune parameters accurately:

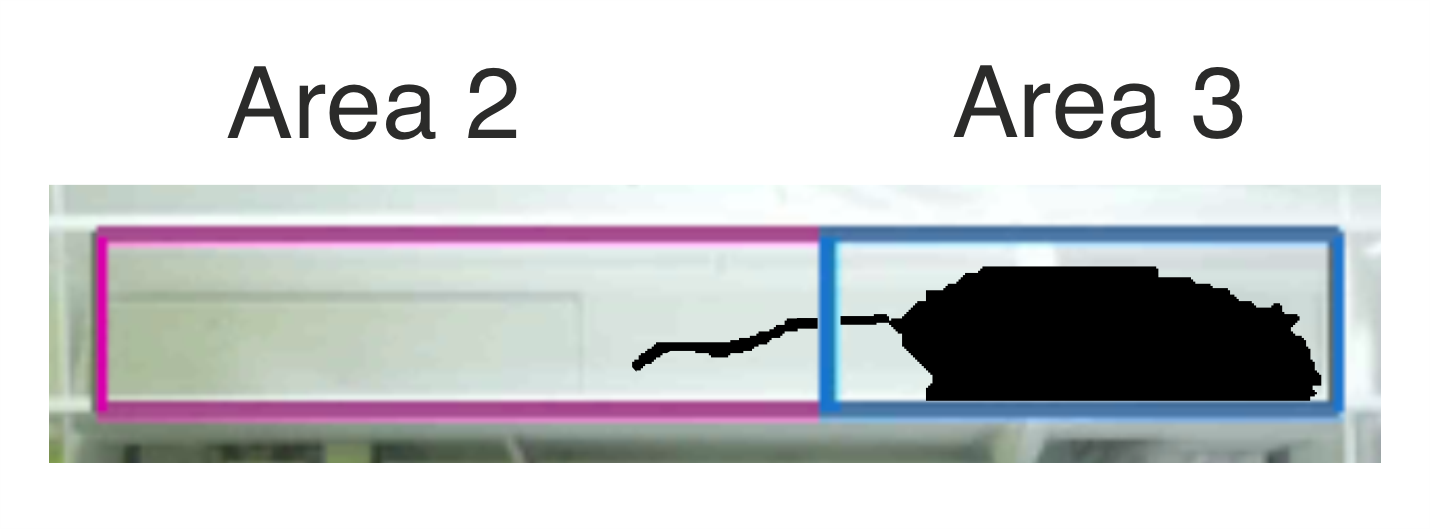
To calibrate the remaining two limits (empty_limit and subject_limit), review the following empirical example:

In this scenario, a single animal typically occupies between 1,800 and 2,800 pixels depending on its posture, whereas two overlapping mice occupy between 2,600 and 3,600 pixels. Setting the subject_limit to approximately 2,500 pixels establishes a safe operational margin, though there may be cases where a single animal is not allowed to enter if it stretches fully.
Even with conservative thresholds, two animals can be misdetected as a single subject if they align perfectly by stacking on top of each other. To minimize such errors, the gating algorithm mandates that all camera conditions remain stable for at least 500 ms following an RFID detection, as it is highly improbable for two animals to maintain such static, perfect alignment for that duration.
Calibration Best Practices
Never set
empty_limitto zero: Always maintain a small tolerance margin (typically 40 to 50 pixels). Setting this parameter to absolute zero will cause minor baseline noise or corridor debris to lock the system, preventing animals from entering the operant box.Be conservative with
subject_limit: It is critical to prevent a double-entry (two animals sneaking into the operant box together). Set this threshold tightly. If a single animal stretches out fully and temporarily exceeds the limit, it will simply be denied entry and can retry later.
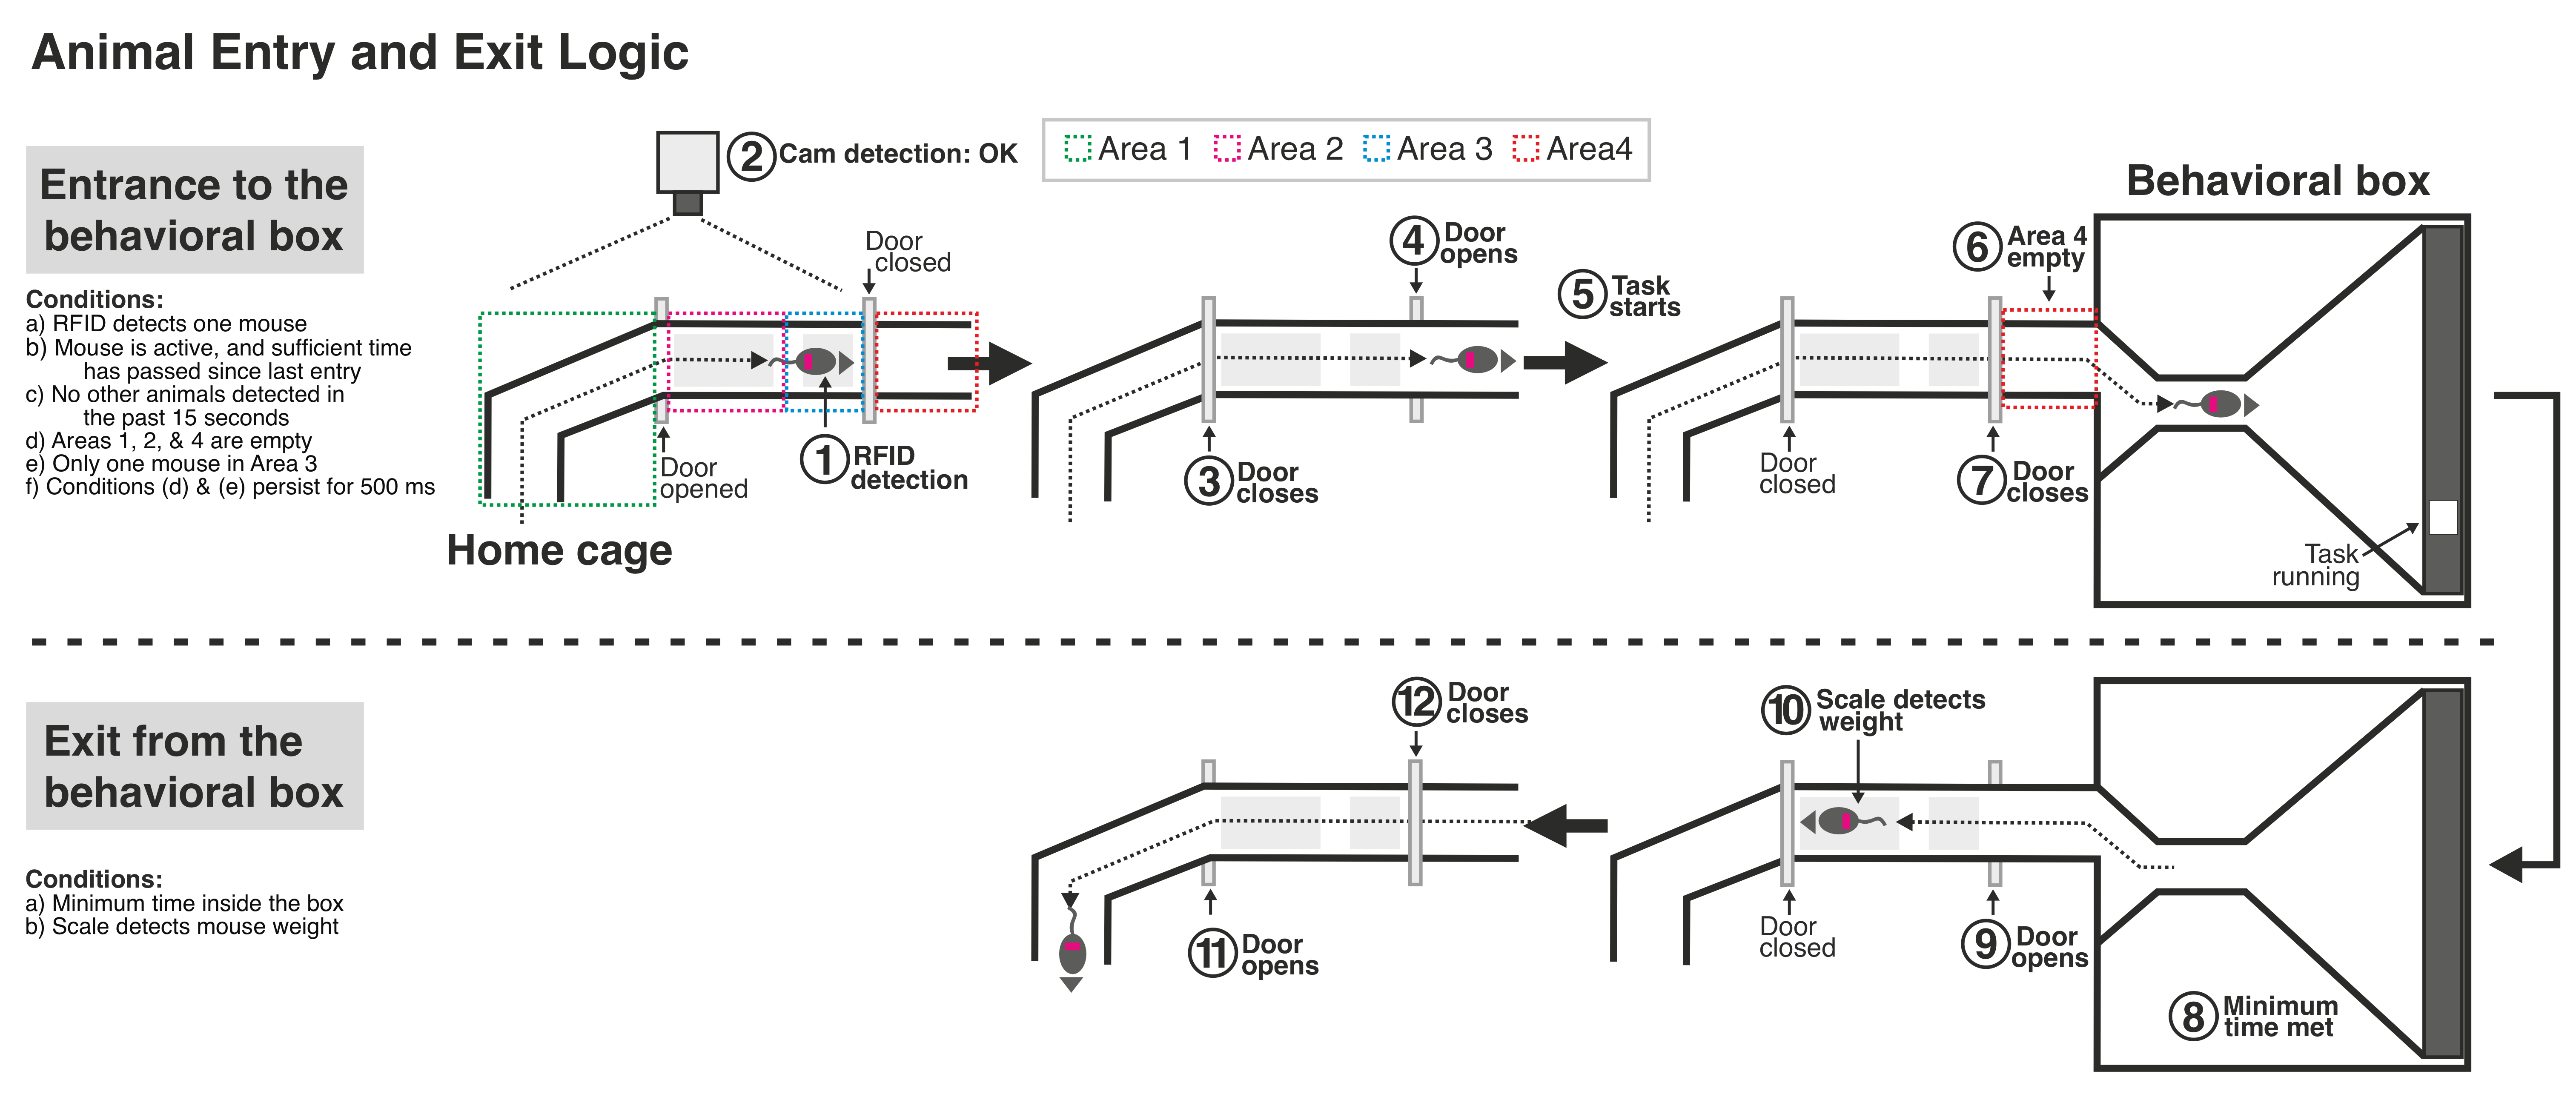
When an animal is detected by the RFID antenna, the system evaluates the real-time pixel status of all four regions. For the system to safely open the gate and permit entry into the behavioral arena, Areas 1, 2, and 4 must be empty (below empty_limit), and Area 3 must contain only one mouse (below subject_limit).
These conditions must remain stable for a minimum hold-duration of 500 ms, and no other RFID scans must have occurred within the previous 15 seconds. Both timing parameters can be customized under SETTINGS -> CORRIDOR SETTINGS.
Detection in the Operant Box
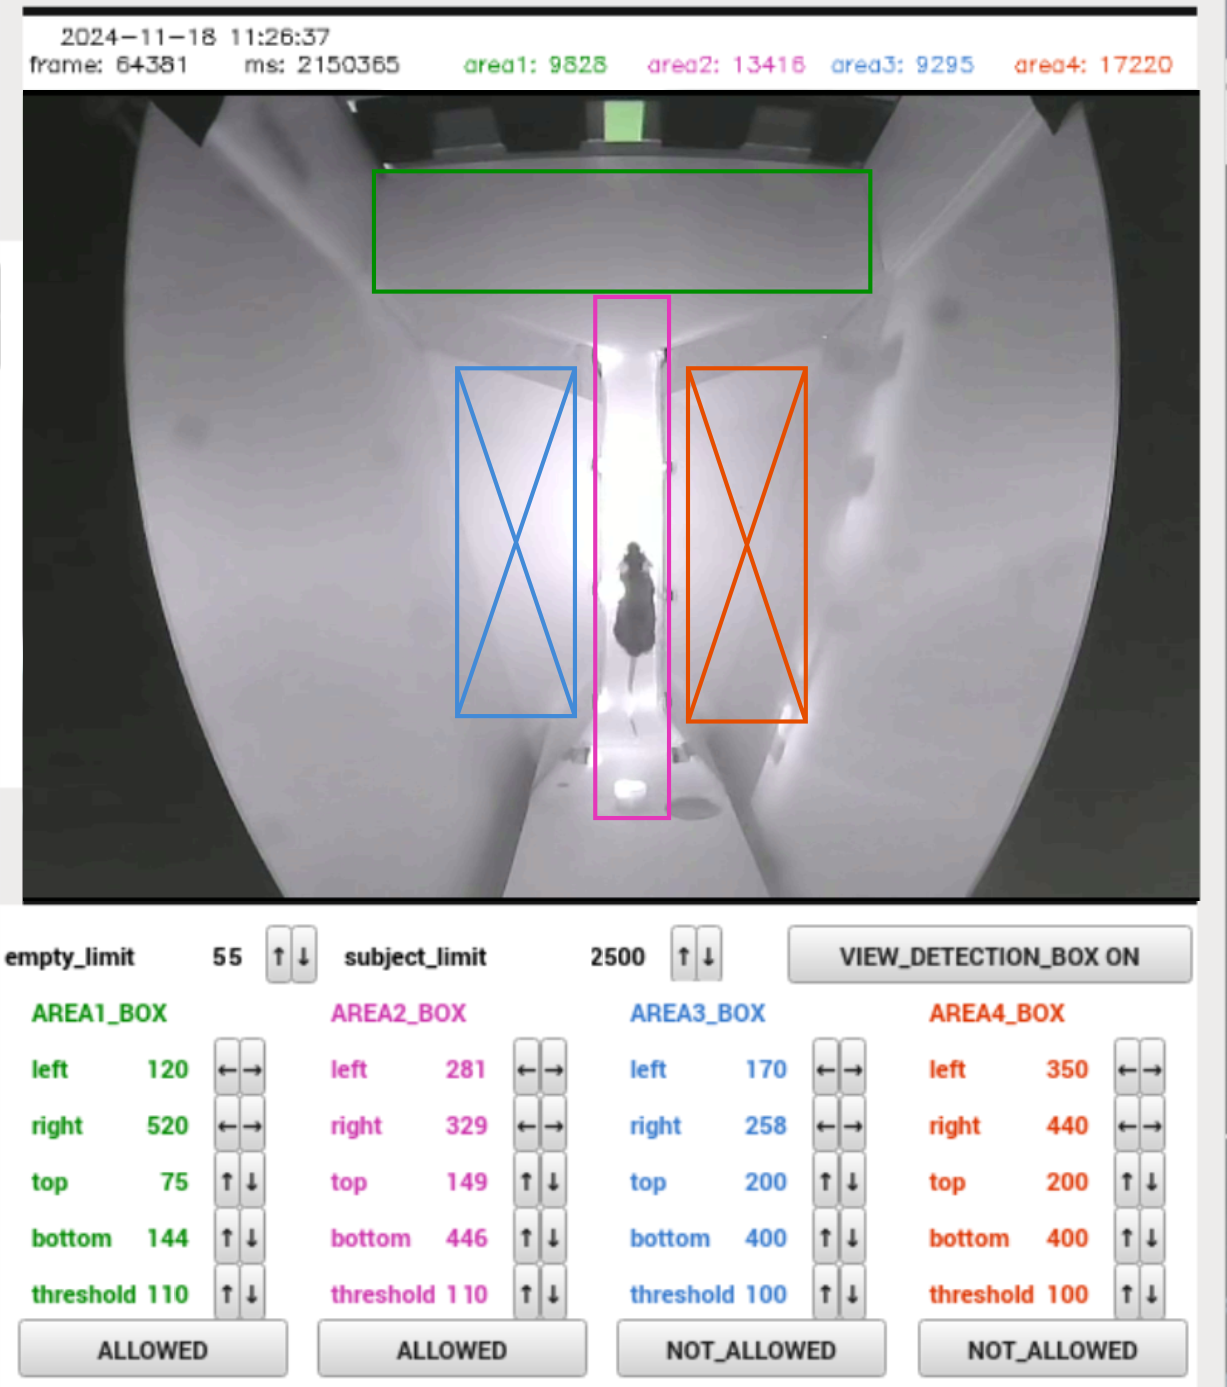
The system supports the definition of up to four custom zones within the operant chamber. Each configured area can be assigned one of three operational behaviors:
ALLOWED: A zone where the animal is expected to be. An alarm will trigger if the detected pixels exceed thesubject_limit, indicating the possibility that two animals may have entered the operant box simultaneously by mistake.NOT_ALLOWED: A zone where the animal should not be. If pixel counts exceed theempty_limitwithin these regions, the system immediately sends an alarm via Telegram.TRIGGER: Advanced behavioral zones linked to the real-time centroid tracking module rather than simple pixel counting. When the system detects the animal’s coordinates \((x, y)\) entering aTRIGGERzone, it instantly fires a user-defined Python callback function. This can be customized to deliver real-time experimental events, such as playing a visual or auditory cue, lighting a LED, or transitioning the behavioral task state.
In the reference image above, the corridor and the touchscreen area are elevated and represent the zones where animals are expected to be. The blue and red zones, on the floor, should remain free of animals unless one has jumped into them.
Note
Every time the detection algorithm processes a frame and extracts the animal’s \((x, y)\) coordinates, it passes them to a customizable tracking function. While this is primarily used to fire actions when entering a designated TRIGGER zone, you can also write custom code that depends entirely on the continuous coordinate stream to log trajectories or trigger position-dependent stimuli.