
 village
Animal Handling
Microchip implantation
To individually identify animals in the Training Village, each animal is implanted with a glass-covered microtransponder that emits a unique identification code when within range of RFID sensors. Briefly anesthetize the animals with isoflurane. For mice, perform the implantation in the lower back, near the tail. To ensure correct placement, insert the needle subcutaneously in the scapular region. Keep the skin gently lifted while you advance the microchip under the skin toward the lower back. Once the microchip is released, hold it gently in place with one hand while you withdraw the needle to ensure it remains properly positioned.
Water restriction method
Weigh the animals at least three times to determine their respective basal free-restriction body weight. If animals begin training while still juveniles, recalculate the basal weight according to their natural growth. Maintain the animals’ body weight always above 80% of their basal free-restriction weight. If a subject falls below 80%, immediately remove it from training and provide supplemental free water and hypercaloric food until recovered.
Habituation to the TV and User
Day 1: Move the animals to the TV room. Handle them while offering rewards (5-10 minutes/subject). Record their weights.
Day 2: Handle the animals while offering rewards. Record their weights. Implant them with the microtransponder.
Day 3: Handle the animals while offering rewards. Record their weights. Place the animals in the Training Village home-cages and begin water restriction by providing 2.5% citric acid (CA) in their water bottle. At this stage, corridor access is not yet open: one of the 3D-printed plastic pieces (visible in the image below) acts as a blocker, sealing the home-cage exit toward the corridor. This piece will be removed on Day 4.
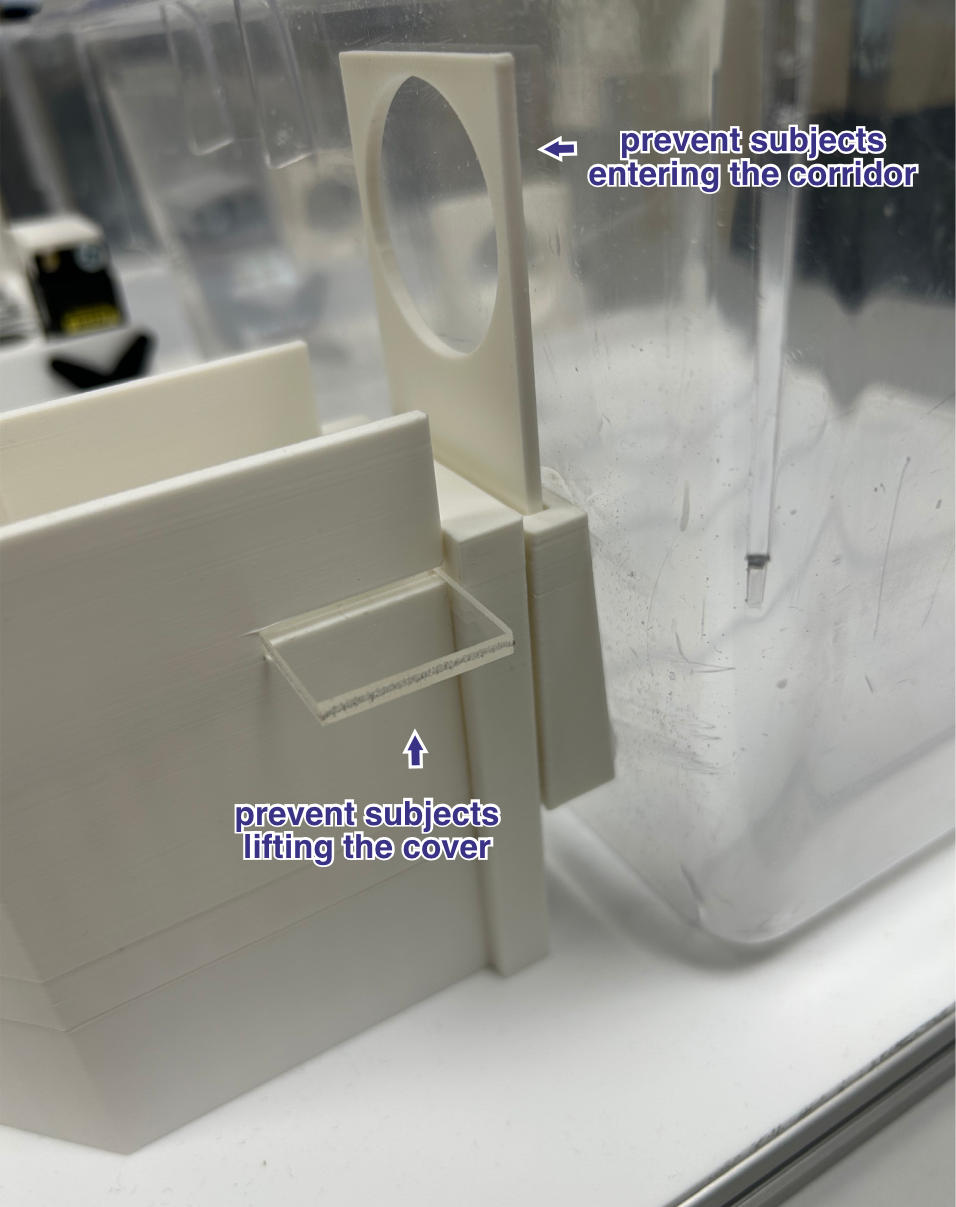
The blocker piece fits over the home-cage opening, preventing animals from entering the corridor while still allowing them to settle into their new environment.
Day 4: Remove the blocker piece from each home-cage opening to grant animals access to the corridor. Door 1 will remain open, while Door 2 remains closed. With the RFID reader active, any detected animal will be granted access to the operant box automatically.
Before this step, make sure all animals have been registered in the system with their corresponding RFID code — see Subject Management for instructions on how to add subjects.
Notes on the CA:
If animals, over time, perform few trials while maintaining high relative weights, this indicates they have adapted to the bitter water and are using it as their main water source. In this case, increase the CA concentration by 0.5% and monitor their task motivation and relative weights over the following weeks. If the issue persists but weights remain high, repeat this step weekly until a maximum of 4.5% CA.
Mixing animals protocol
When housing large cohorts in the TV, animals from different cages may need to be mixed. Always match animals by sex, and when possible, by age and genotype.
Step 1: Scent exchange Purpose: Acclimate mice to each other’s scents to reduce initial aggression. Action: Swap a portion of bedding/enrichment between the groups. Allow 24 h for scent familiarization.
Step 2: First neutral introduction Purpose: Face-to-face contact in a neutral, enriched environment to reduce territorial aggression. Action: Place both groups in a neutral cage with enrichment for 30 min (reduce to 10–15 min if continuous fighting occurs). Monitor continuously. Return animals to their original cages, mixing the bedding. If only minor fights occur, proceed to Step 3 the next day. If major fights occur, repeat Step 2 the following day.
Step 3: Cohabitation in a fresh environment Purpose: Establish cohabitation in a fresh environment (the TV) while retaining familiar elements. Action: Mix the two groups in the TV with clean cages. Place Group A bedding/enrichment in one cage and Group B bedding/enrichment in another. Provide food and water in at least two different cages (duplicating resources helps prevent competition). Observe for 2 hours. If no significant aggressions occur, leave animals together overnight and continue with step 4 the next day. If intense fights occur, separate them and restart Step 3 the following day.
Step 4: Surveillance Action: Monitor the mice closely for one week after cohabitation. Check for signs of aggression: wounds, fur loss, weight loss, marked submissive behavior, or changes in eating/drinking. Remove any wounded animals and isolate them until healed. If intense fights persist 3 days after cohabitation, move to the retry plan. A successful mixing is declared if minimal fights occur and no visible signs of aggression are present after one week.
Notes on Sex Differences::
All steps are essential when mixing males, however, for females, step 3 can be skipped on many occasions.
Notes on the Retry Plan:
Apply it if aggression persists (multiple animals show signs of aggression, intense fights 3 days after cohabitation, or moderate but constant fights after 1 week).
Action: Separate animals for 48h, allowing visual and olfactory contact but preventing physical interaction. Restart the mixing protocol with progressive steps: 10 minutes → 30 minutes → 2 hours → cohabitation. If unsuccessful, attempt mixing smaller subgroups and combine progressively. If aggression still persists, consider the animals incompatible and stop mixing attempts.